Testing – CorkSport External Wastegate Housing for Mazdaspeed

Turbo EWG

Why EWG?  (it’s just about awesome turbo noises)

We hear this alot as the Mazdaspeed platform continues to grow and the 450-500whp build becomes the status quo. Following up the EWG Housing Design & Details Blog about the new CorkSport EWG Housing, we want to share some testing data and differences we saw between an IWG (internal wastegate) and EWG (external wastegate) setups.  

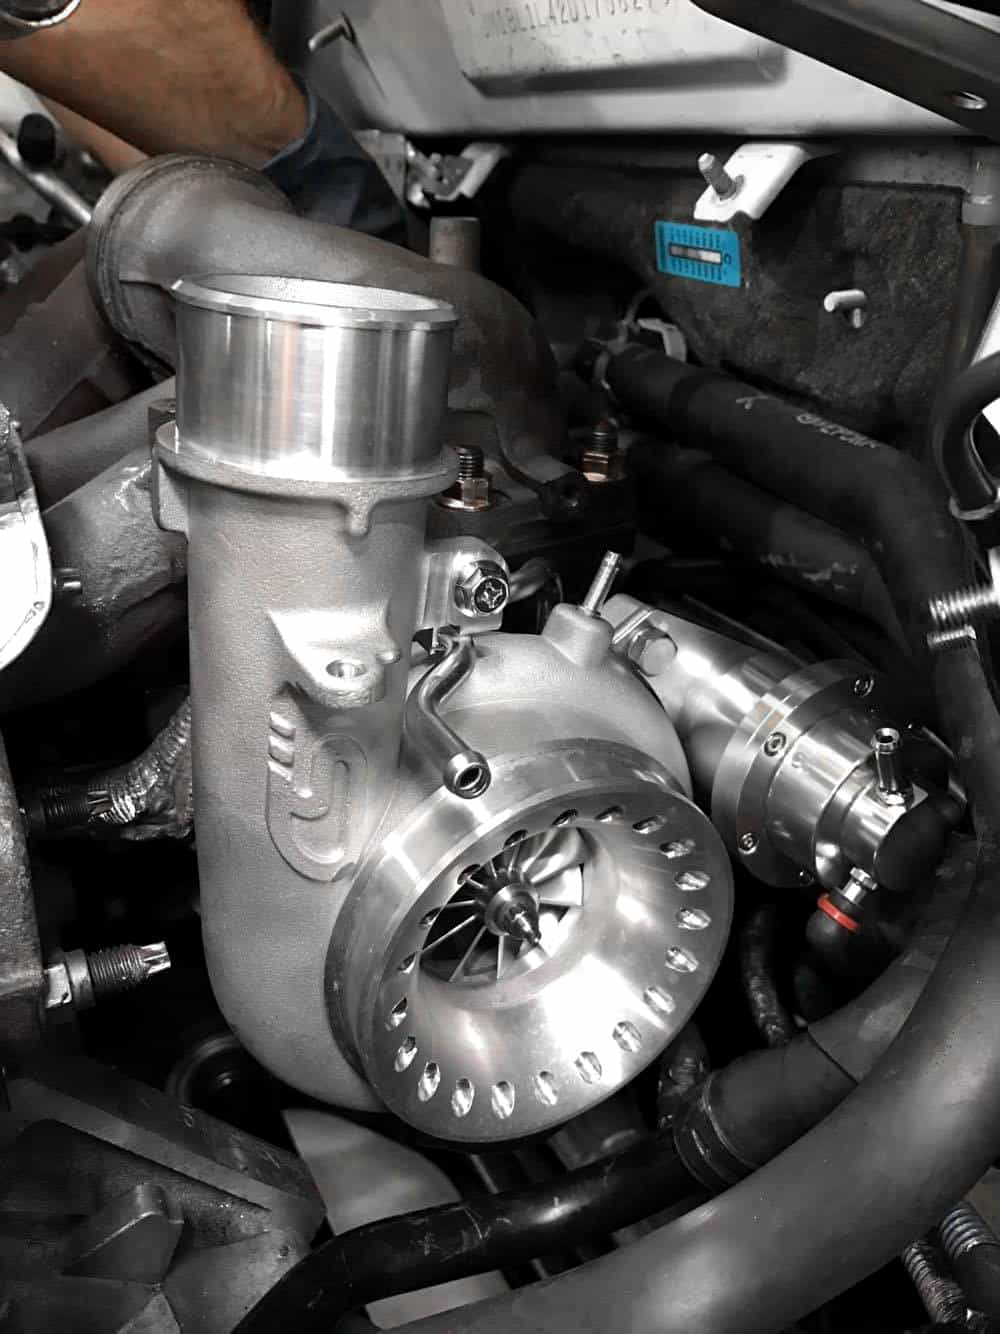
Details about design, flow, placement, data, and feedback from our CST4 EWG Beta Tester.  

IWG vs EWG comparison on the CST4
IWG vs. EWG on the CST4

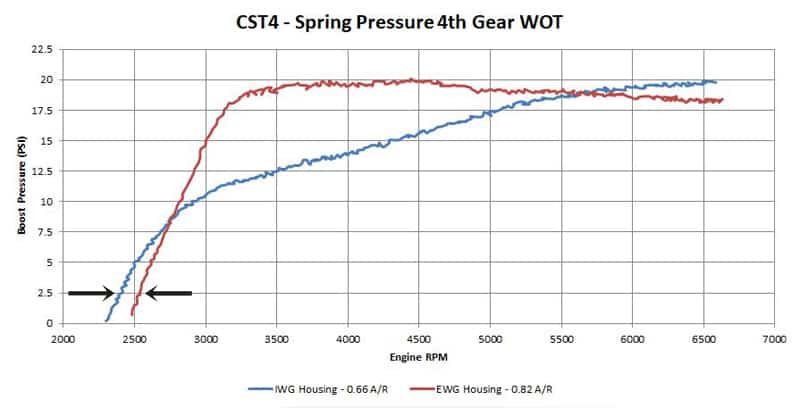
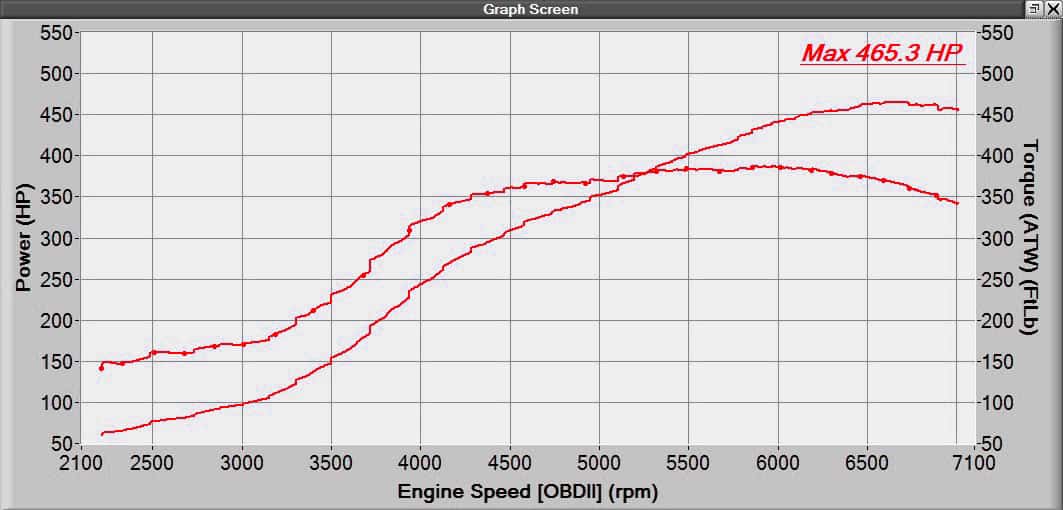
Let’s jump right in!  First up is a spring pressure comparison between the IWG and EWG housing on a CST4 turbocharger.  Let’s first define what “spring” pressure is: this is the resulting boost pressure with 0 added wastegate duty cycle.  AKA we are not trying to add boost pressure.

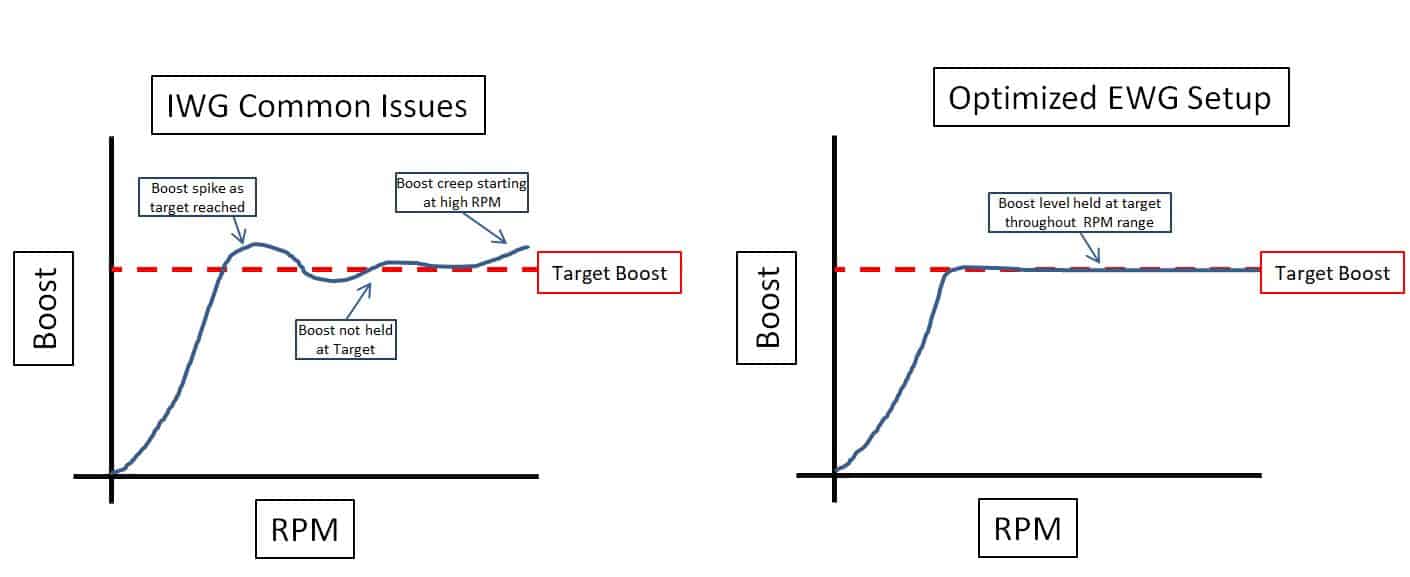
Immediately you can see some very obvious differences.   The IWG setup has a taper up boost curve that could be considered boost creep.  Some boost creep is ok, but an excessive amount may reach the capacity of the fuel system or other systems in the vehicle.  In this setup that is not the case, but it does show that the IWG is at its limits for boost control.

With the EWG setup you see a much different curve.  The boost builds a few hundred RPM later (due to the larger 0.82 A/R) then climbs right to the spring pressure and then settles to a consistent plateau; very predictable and controllable.  

CAD EWG and IWG Designs
CorkSport EWG and IWG Designs

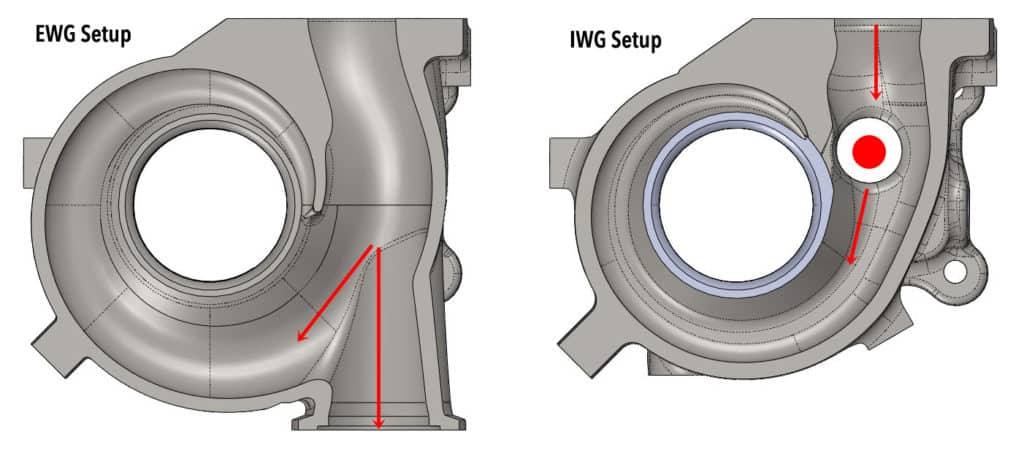
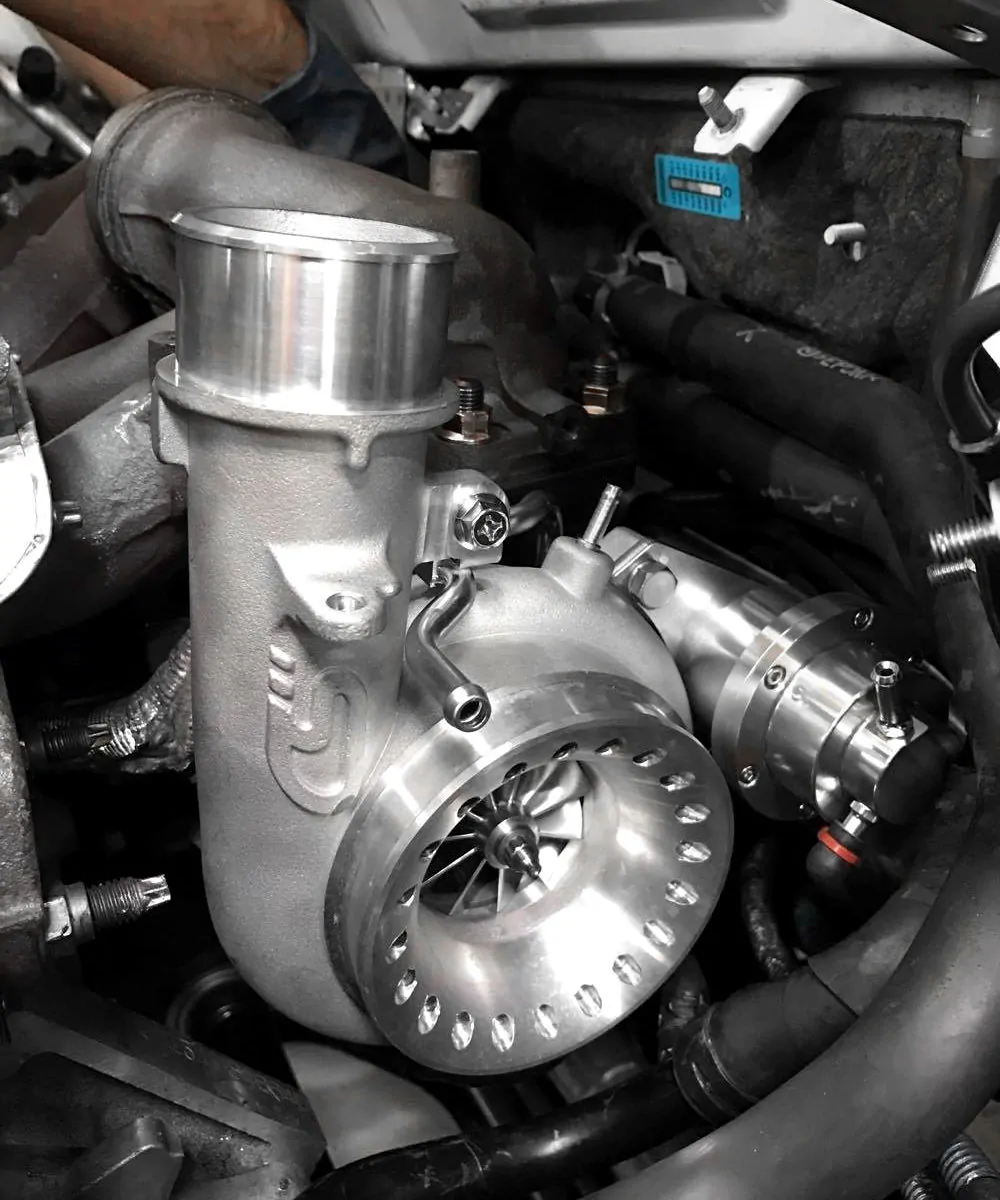
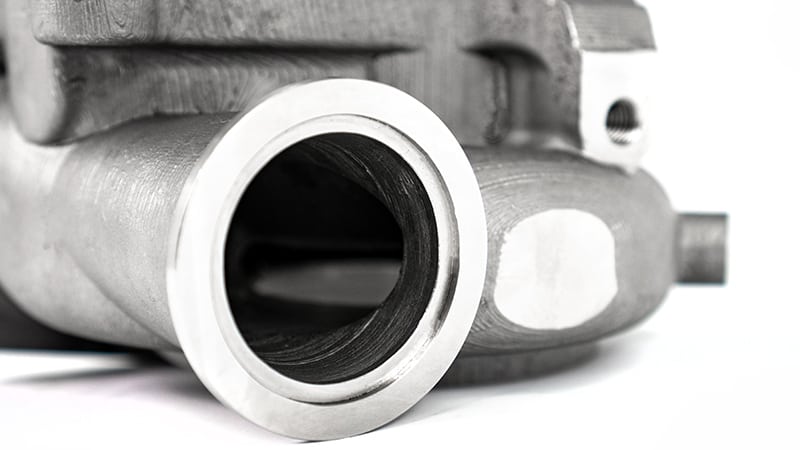
Now let’s look at the design to better understand why.  On the left is the EWG turbine housing with a 0.82 A/R and on the right is the IWG turbine housing also with a 0.82 A/R (we don’t want the A/R to be a factor in this review).   

The EWG housing has a very efficient flow path for the exhaust gas to reach the EWG control valve along with a much larger path to flow.  Both of these features provide excellent flow and thus control of boost pressure.

The IWG housing uses a side port in the turbine scroll to exhaust gas.  In this setup, the exhaust gas must make an abrupt turn and pass through a much smaller port.  Both of these issues reduce boost control.

EWG and IWG Explained

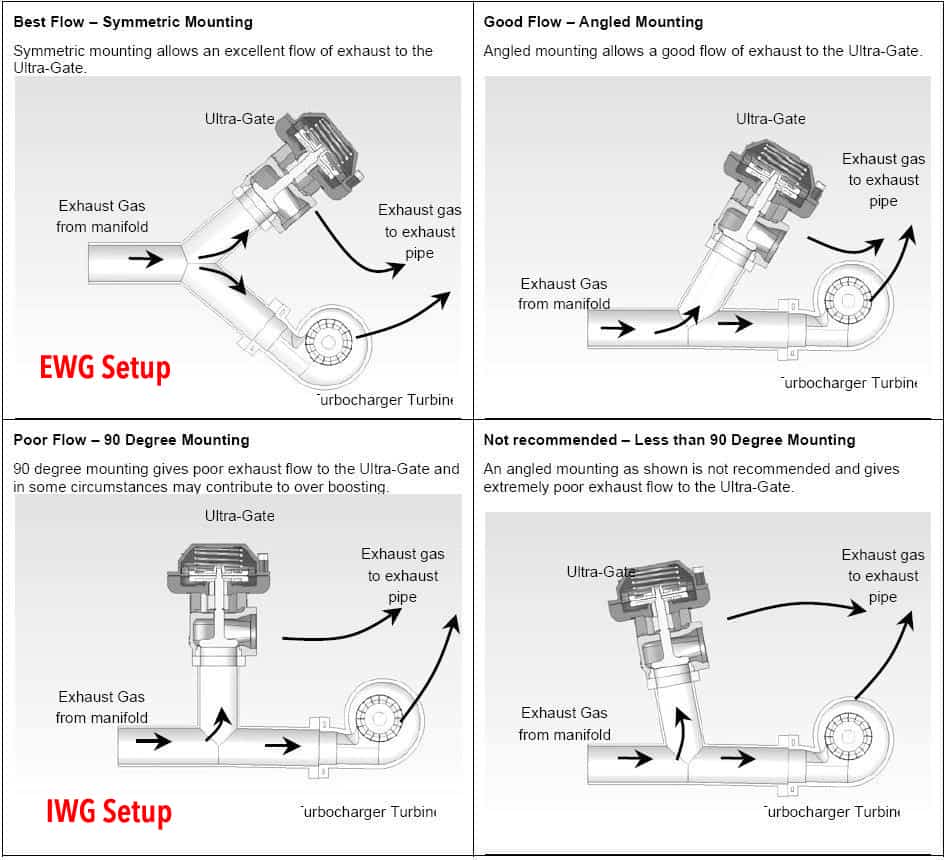
Here is a diagram showing placement of an EWG in the exhaust pre-turbine.  Granted we are comparing a EWG and IWG, but the concept of flow is the same.  

Exhaust gases will always take the path of least resistance and if the turbine wheel is the easier path than the wastegate then boost control will be more difficult.  

Internal and External Wastegate performance chart
(Left) Internal Wastegate Setup | Common Issues
(Right) External Wastegate Setup | Optimized Setup
Click to Expand

This graph was shown in the last blog, but we want to show it again so you can directly compare it to the data graph below.  

Below is the boost curves for the CST5 in both IWG and EWG setup.  Alone each graph actually looks really good, but when overlaid you can see some interesting differences.  

CST5 Dyno testing with IWG and EQG setup

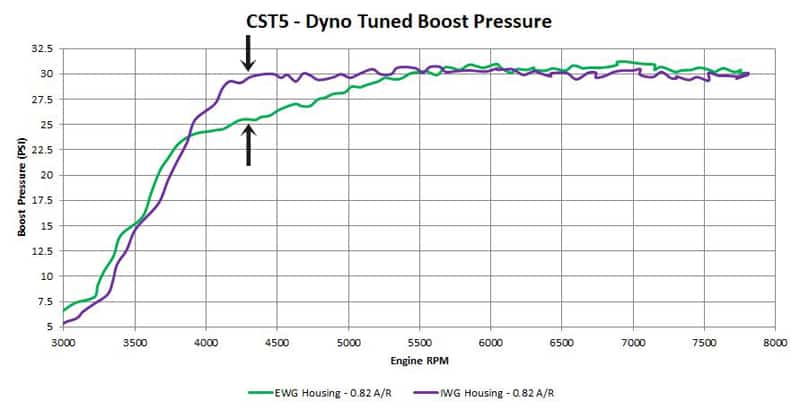
IWG vs. EWG on the CST5

The purple IWG graph has a crisp spool and then flat-lines at approximately 30psi with a slight fall off at 6500rpm.  The CST5 IWG setup does control boost really well, but holding the turbo back at spool up and not over-boosting or spiking was a small challenge.  An abrupt boost curve like this can make the car somewhat difficult to drive because the torque “hits” very hard and you lose traction.

The EWG setup was a bit more controllable.  Not only did the CST5 Mazdaspeed turbo spool a bit sooner, but we were able to better control the spool up boost curve so we could create a torque curve that was more friendly to the FWD traction.  This makes the car more fun to drive. Looking at the higher RPM range we were also able to hold boost more consistently to 7500rpm.

CorkSport External Wastegate

We hope you guys and gals are as excited for the EWG options for the CST4, CST5 and CST6.  They really are an awesome setup for any driving style and power goal.  

Thanks for tuning in with CorkSport Performance.

-Barett @ CorkSport

Creating CorkSport Parts with 3D Scanning

While creating a new CorkSport part, we sometimes run into issues where calipers, bore gauges, and angle finders are simply not enough to get the measurements we need.  We’ve discussed how we use 3D printing in a previous blog, but today I thought I’d go over the opposite: 3D scanning.

Where 3D printing takes a CAD design from computer to physical part, 3D scanning takes a physical part and converts it into a computerized model. This is especially useful for things like intercooler piping, intake design, and even creating exterior body parts. What these components all have in common is that they are a complex, difficult to measure, shape where fitment is critical. Check out the 3D scan below from the development of our GEN2 Mazdaspeed 3 front lip. While not a perfect replica, this 3D scan information was vital for designing the CS front lip to ensure great fitment and stylish look.

At CorkSport, we do have a small 3D measuring arm that can take measurements of 3D objects and input them directly into a CAD program. The arm does this by first having a “home” position established that the arm can measure from. Then as the arm is moved around, it knows how far the tip of the arm is from the home position in x, y, and z coordinates. This is a very basic form of 3D measurement as the arm must actually touch the surfaces of the part. Mostly simple information like mounting surface locations, angles, and hole sizes can result from this arm. While not a full 3D scan, it is especially useful for things like the GEN3 Transmission Motor Mount that have mounting planes at different angles.

For intercooler piping with completely round surfaces and bends, CorkSport’s 3D measuring arm has its limitations. We typically get a full 3D scan performed on the OEM piping to give us solid locations and a great visual reference to design from. The 3D scanning arm bounces a laser off the part to determine its shape and size. Then, software that accompanies the 3D scanner stitches all the information together into a full 3D CAD model. The scans achieve great accuracy; check out the embossed writing and even texture on this OEM intercooler piping for the SkyActiv 2.5T.

From this point, we design the new CorkSport parts. In terms of intercooler piping, we analyze where the larger piping will fit to get the performance gains we want. In some cases, we can also simplify the pipe routing to get smoother airflow than the OEM piping. Having a full OEM piping scan makes this much easier as we can easily double check our measurements with the OEM parts on the car. As a result, our first 3D print can often be the final version before having metal parts made. An early design for an upgraded Mazda 6 SkyActiv 2.5T hot pipe is shown below (blue) with the OEM part scan (gray). The routing was carefully chosen to achieve our desired piping size within the constraints of the OEM engine bay.


3D scanning has a huge range of uses and we are just beginning to explore the full capabilities. Be sure to share your ideas on how we should use this technology and what new CS parts we should make with 3D scanning’s help!

-Daniel

An Inside Look at CorkSport R&D

All CorkSport products go through an extensive process to ensure they are the best fitting, looking and performing parts that they can be. As a product development engineer, I see all of these steps on a day-to-day basis, but we don’t often talk about how an idea evolves into a CorkSport part.  Sit back and read on as I give you a glimpse of what goes on during CorkSport R&D.

Concept and Planning

All parts start out as an idea. They come from many sources: employees, forums, car shows.  One of our biggest sources of ideas is YOU! Check out the blog on submitting product ideas for more info on how our customers give us their thoughts.

At the beginning of each quarter, all product ideas are evaluated to determine which are feasible and which are going to be pursued moving forward. After the extensive list is narrowed down, they go into a more in-depth evaluation.

This includes defining the scope of the project, how many man hours it is expected to take, evaluating all expected costs of production, and setting a retail price. Without this evaluation, we would encounter all sorts of roadblocks along the way that would delay getting parts out to you all. If everything is looking good, the project is approved and moves forward.

R&D Begins

At this stage, it’s time to get our hands dirty (literally in some cases). First, we investigate the car the part is for and the scope of the project to understand exactly what the goal of the part is. Doing this allows us to find all design constraints and look for things we may not be expecting. Replacement part diagrams and factory service manuals can be vital here, especially if we do not have a Mazda or Mazdaspeed readily accessible.

By now we usually have a good idea of what features we want the part to have and can move forward with creating an “MVP”. A minimum viable product is just what it sounds like. Not necessarily pretty or optimized yet but good enough to get to see if an idea will work and to check fitment. During MVP creation we have to consider all design constraints, desired features, integration with other CS parts, and even how to manufacture the part. Check out the changes below from an early MVP to the final design for our GEN3 TMM.

If the part can be 3D printed, we print the initial MVP and test fit. Test fits are by far the most unpredictable part of the whole process as sometimes we discover an issue that can change an entire design. Depending on the part, we can have one test fit and be good to go or four and still have work to do. Once we have revised the MVP to a point where it fits well, looks good, and can be manufactured relatively easily, a functional prototype is produced.

Functional Prototypes

This is where the fun really begins; test fitting is a 3D print is one thing, having the part made out of metal is a whole new story. Depending on the part, we sometimes have to skip directly to this stage as it cannot be easily printed in-house. We always have to be careful doing so to limit the number of expensive prototypes we have made. Sometimes this goes well, other times not so much… This swaybar prototype was limiting suspension travel.

A functional prototype also allows for any testing that we may do. Whether it be on the dyno, track, or on the street, all CorkSport parts are used and abused to ensure they hold up to what you can throw at them. Check out an early CS Throttle Body getting tested on a flow bench.

If we are happy with a prototype, this is where you all can get involved again. We often use “Beta Testers” to get another opinion on the part and to see if they come across any issues. From here we sometimes have revisions that need to be made and another prototype produced but ideally, we are ready to move on.

Manufacture & Prep for Release

From here we move to getting the parts made. Sometimes this is a process that only takes a few weeks, other times it takes many months to complete. The manufacturing method, type of part, and order quantity play a big role here. Additionally, some products have a lot of different parts to make up a whole CS product, so each individual part takes time. Sometimes, we even get to see something unexpected, like these Command Wheel Covers before getting anodized black.

While all of this is going on, we are also preparing the product for release. That way, when our manufactured parts show up, we are ready to send them out to all of you. Installation instructions are created, QA checks are set up, laser etch files are set up, product images and video are taken, the web page listing is set up, and so on. Any and all of the content you see on a product is all created in-house. Engineering school definitely did not prepare me for shooting high-quality photos and video!

Check out a “behind the scenes” look at one of our videos:

At this point, we are pretty much ready to bring the new CorkSport Mazda or Mazdaspeed part out to you all. Throughout this process, we are constantly thinking about the experience someone has when they buy the part to ensure it is something that we would be proud to have on our own cars. After all, we build our dream cars using CS parts just like you do!

-Daniel

Mazda’s Game Changer

Recent news has been circulating about the new Mazda and Toyota joint production plant and what will be built there.  In a few news articles, Masamichi Kogai has been quoted saying Mazda will introduce a new and different type of CUV (crossover utility vehicle).

I have been thinking about that statement about a new and different type SUV. Looking in the marketplace, you have pretty much everything out there in size, shape, and quality.  I think there is something which is getting lost in the translation of this message.

My bet is it will be something totally new for Mazda.  

Back in 2015, Mazda showed off the Koeru concept which was hinting to future models of crossover SUVs.

Looking at the current styling and the concept cars Mazda has laid out at the Tokyo Auto Show with the Mazda 3 Kai concept this year.

The front end styling has been sharpened on this concept car, but it isn’t too far outside of what Mazda is currently offering. The changed roofline at the rear points is designed to maximize cargo space, but in a good-looking package.

I will go out on a limb and guess that Mazda is probably working on a new motor to power whatever the upcoming CUV is going to be.

The most powerful motor Mazda offers right now is the 2.5 Skyactiv turbo engine, which powers the Cx-9 and soon to be offered in the Mazda 6. This motor is based on the older Skyactiv tech though, and with Masamichi saying the new vehicle will something new, my guess is that we should expect to see another tech marvel being produced.

The last thought I have on this with Mazda is this:

If they’re coming out with something new, we may see a large-sized vehicle to go up against the truck-based SUVs from other manufacturers. It is a direction Mazda has not gone before and lines up with the statements they are giving us.

Time will tell!

-Derrick

CorkSport BIG Turbo for the Mazdaspeed & CX-7

Mazdaspeed 3 big turbo upgrade

Good day boosted enthusiast!

We wanted to take some time to give you all a quick update on one of the many projects we have brewing up here at CorkSport Headquarters.

The project I’m referencing, in general, is our 2nd turbocharger upgrade for the Mazdaspeed 3, Mazdaspeed 6, and CX-7. This unit is a substantial upgrade over our current 18G turbocharger. This Turbo will cater to those looking to take their performance and power goals to a higher level.

Not only will it be capable of putting you well into the 465whp range but this CorkSport Turbo upgrade will be able to do it without giving up on reliability and throttle response.  

It will be very beneficial to those who have mildly-built blocks and a supporting fuel system that will allow them to get higher in the HP range.

So, let’s talk about some of the features you can expect on the upgrade and why we decided to utilize them.

Let’s start at the heart of the Turbocharger.

The new CorkSport Mazdaspeed turbo will take full use of a GTX3076R center housing and rotating assembly (CHRA). The unit is equipped with a fully sealed ball-bearing cartridge, which is a nice upgrade when compared to a standard journal-bearing unit. We chose to go with a ball-bearing unit for a few reasons.

  1. The enclosed design of a ball bearing system allows us to eliminate the need for a thrust bearing, which can account for about 40% of the bearing system drag on the turbo rotor assembly.
  2. Ball bearings reduce the viscous drag, which allows a ball-bearing unit the ability to spool up about 15% faster than its journal-bearing equivalent.

The next thing you will notice on the new Mazdaspeed Turbocharger upgrade is the holes that are drilled into the compressor cover. These little holes are known as anti-surge ports and are intended to expand the turbochargers compressor map. The ports function to move the surge line further left on the compressor map which gives the Mazdaspeed turbo some more headroom before it falls out of its efficiency island. Anti-surge ports are becoming increasingly popular in modern performance turbochargers and with great reason. They offer some unique benefits as mentioned and will be fully integrated into our unit.

Last but not least, as with our CorkSport Turbo, this bigger Mazdaspeed Turbo will once-again be a true drop-in unit; minus the 4” compressor inlet.

There will be no cutting, modifying, sourcing oil and coolant lines, running to the store to buy couplers, etc. This unit will come with everything you need to have a trouble-free install. As with the current CorkSport 18G turbocharger, the new Garrett-based design will come with all studs, gaskets, washers, and knowledge that you need to have a nice weekend install.

So keep your eyes peeled as we get closer to delivering more performance for the Mazda community!

– The CorkSport Team

SOURCES: Miller, Jay K. Turbo: Real World High-Performance Turbocharger Systems. CarTech, 2008.