Project MX-3 Gauge Faces, and Short Shifter
Project MX-3 - STEP 5
Installation of CorkSport Gauge Face Set
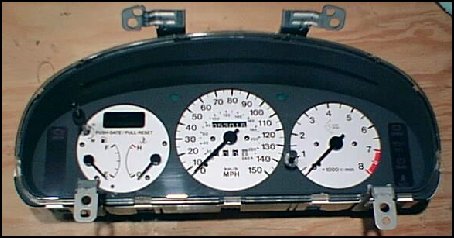
We installed a set of our custom guage faces. They come in a kit which includes 3 faces, 1 needle puller, and installation instructions. The installation process will take at least 2 hours (subsequent installations are much quicker). This upgrade is fairly difficult due to the calibration of the needles. We devised two methods of recalibrating the needles:
- Method #1 (preferred): requires a function generator and numerous resistors.
- Method #2: requires an external source to measure engine RPM.
- Both methods require a 12V DC power source. You'll need a screw driver, electrical experience, and a steady hand for both methods.
They are well worth the time and risk involved for us. There is a shadowing effect during nighttime use due to the nature of the design. Instead of lighted numbers you will see the entire face illuminated. The new faces look good at night and great during the day.
This would have been a great time for us to install the Mazdaspeed Carbon look dash panel but we chose to do that at a later date.
Installation of the Pacesetter Short Shift Kit
This Pacesetter kit comes complete with everything you'll need to install it except a few tools which are:
- Philips screwdriver
- 12m socket
- Remove the center console which includes the shift boot assembly. We removed the entire assembly from the ashtray to the E-Brake housing as one peice. There are two screws and two plastic "push pins" toward the engine end of the console. You'll also have to remove two screws which attach the center console to the E-brake housing. These are near the floor and inbetween the seat and exhaust tunnel. We pulled up on the E-brake housing and gently removed the center console. Whala! There's the part we were trying to get to. Remove the insulation.
- From the underside of the car you'll have to remove the bolt which attaches the shifter to the shift rod. We did not have to remove any part of the exhaust system to access this bolt.
- Back inside the car again: Pull off the rubber boot which sits on the top of the "greasy mess". There is a spring inside which holds the shifter in place. Remove it. The shifter can now be removed.
- We installed the Pacesetter shifter with the ball just a little over 2/3's towards the upper end of the shifter. This resulted in a shift throw which is much shorter than stock. This setting will probably be great for most people.
- From this point the remainder of this installation is simply the reverse of removal. Be cautious not to overtighten the shifter/shift rod bolt. This will make it very hard to shift!
Our shifts are now a little notchier but much shorter. This was a definite improvement over the stock setup. If you can live with the notchier shifts you'll definately want to consider this mod..
Our impressions of the Bronzoil bushings will be posted withing the next few days.
Back to the Project MX-3 page